Do you remember all the problems you had when you opened the shop? Do you remember how you try to make the panels for the moulding samples? and again, do you remember the problem of the samples hanging from one side? and the nails that fell down? and the problem of adding new samples?
All these problems no longer exist thanks to the new system developed by Rinaldin.
|
|
In a very schematic way it can be said that the system consists of a series of panels equipped with vertical rows of holes. Into the holes you have to insert special plastic hangers that have the task of supporting the moulding samples.
Let's now analyze in detail the various elements of the system.

The hangers
Hangers are made of transparent plastic material. They consist of an angle that must support the sample and two small cylinders that must be inserted into the two holes. The panel, in fact, is equipped with vertical rows of pairs of holes.
The panels
The panels are made of 18 mm thick melamine chipboard with ABS edges to withstand more impact. They can be placed side by side to form a single panel visually.
Each panel is equipped with vertical rows of pairs of holes to which the hangers must be inserted. The vertical distance between a pair of holes and the next one is 16 mm.
It should be noted that by juxtaposing several panels, the distance between rows of hole pairs remains constant as if it were a single long panel.
How to hang the panels
To hang the panels there are several alternatives:
• You can use normal hangers. Better if you use trapezoidal hangers that allow a certain tolerance of error. Even better if plastic dowels are applied in the wall for greater safety.
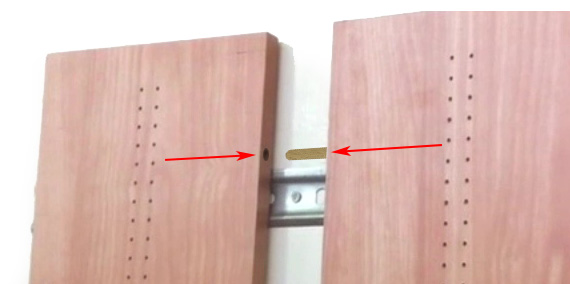
• Another system, which is advisable if the panels are more than two, consists in applying a special metal bar to the wall, similar to the one used to hang the cabinets of the kitchens.
A piece of the same type of bar must be applied on the back of the panels so as to fit in with the bar fixed to the wall.
![]()
The lower part of the panel should be detached from the wall at the base to compensate for the detachment created at the top. To do that ust attach a plastic hanger to the back of the panel.
After hanging the panels you have to place them together so that they are perfectly aligned horizontally and give the visual impression of a single panel. This is achieved by inserting three wooden pins on the appropriate holes on the right and left of each panel.
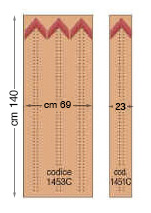
The panels are available in two formats:
• Panels with 3 rows of holes
• Panels with only 1 row of holes
It is always preferable to adopt the panels of three rows because you have less installing problems. Single-row panels only serve when a wall has to be completed and space is not sufficient for a three-row panel.
|
|
The advantages of the system
The advantages are numerous compared to the traditional system:
• First of all, the framer finds the solution ready and has to make it himself. He no longer has to prepare the panels, apply the rows of nails, and so on. Especially for beginners, who do not have much experience, this is a big advantage compared to what happened years ago.
• Samples are always perfectly aligned vertically and do not hang from one side. The shape of the hanger, in fact, is studied to give the samples a perfect alignment.
• The distance between a sample and the next one is adjustable according to the width of the moulding.
• As a consequence of the previous point, you can quickly change the arrangement of samples when new mouldings arrive or when old mouldings are removed.
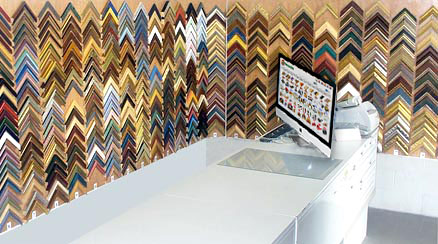
• Tidy display of samples gives the store an elegant and professional look.
Once the installation is complete, the samples are hung on the panel. This phase does not require special instructions. The way the samples are arranged on the panels depends on the aesthetic taste of each framer. Here we want to give only some suggestions dictated by experience.
When applying samples it is preferable to start from the bottom up and not vice versa. In this way it is easier to find the right distance between a sample and the next one.
It is better to leave a certain space between one series and another of samples. In this way the series are more highlighted and enhanced. Furthermore, the search for the sample and its resetting in the panel after use is easier.
One of the most felt problems is the sample search in the panel and its reset in its place after use. There are various sample exposure criteria:
1) In order of code. It is advisable to write down the moulding code on both ends of the sample with a marker.
2) In order of type. For example: golden frames, walnut frames, lacquered frames, etc.
3) In order of functionality. For example: frames for prints (with low rabbet) - frames for canvas (with high rabbet).
4) In order of size. (ie, width of the mouldings).
For more detailed information on how to install the sample panels, you can watch the video "Exposure system of the samples at the corner of the auctions"
by clicking here